There is a live demo of this application pushed to Heroku here
The code for this post/video can be grabbed from its git repository.
There is a live demo of this application pushed to Heroku here
The code for this post/video can be grabbed from its git repository.
There is a live demo of this application pushed to Heroku here If you visit that link in multiple tabs you should be able to hold a conversation.
The code for this post/video can be grabbed from its git repository.
I’ll be the first to admit I’m not the best presenter out there and this was the first one I’ve given in awhile but hopefully it will prove useful.
The code for this post/video can be grabbed from its git repository.
Basically boot looping is when you see the “Kindle Fire” logo over and over again when you power on the device and it doesn’t do anything else.
I have no idea what happens to the Kindle Fire to get it into this state but my sister managed to do it and this is how I fixed it. This will replace the bootloader on the device and reset it to factory settings. Everything that you have stored on the device will be gone and you will have to reconfigure the device. Basically as if you had just received your kindle for the first time. Once you enter your account information it will sync with your Amazon account and you can redownload anything that you had in your cloud storage and your books will sync with the device. So not everything is lost but it is an inconvenience.
The nice part about this approach is if something like this happens again you should be able to fix it on the device without having to attach it to a computer.
This is just a stock first generation Kindle Fire and the software mentioned in this post only works on the first generation and will cause problems if used on other generations.
The first thing you are going to need is the Kindle Fire Utility which can be found here: Kindle Fire Utility
My screenshots are using version 0.9.6 and the link I provided at the time of posting is for version 0.9.9 but the menu choices are basically the same. The older thread with version 0.9.6 is here: Kindle Fire Utility unmanged thread
Install the drivers for the kindle by running the drivers.bat file that is found in the Kindle Fire Utility download and plug in the kindle fire into your computer.
Once your device is recognized by your computer start the Kindle Fire Utility by running the run.bat file and you should see the following
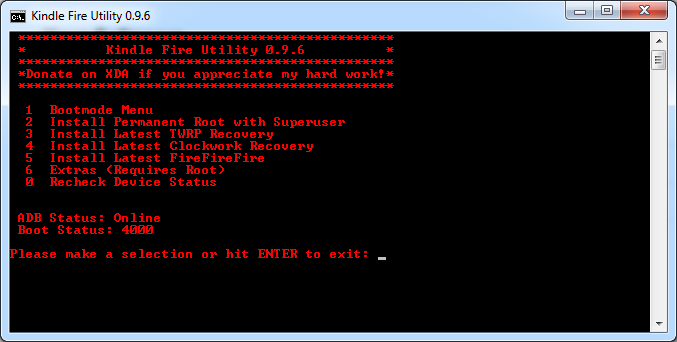
If your boot status isn’t 4000 that fine we are about to change it into fastboot(4002) anyway to install some additional software. You do have to have an ADB Status of “Online” though.
Hit 1 and press enter to choose the Bootmode Menu and you should be looking at
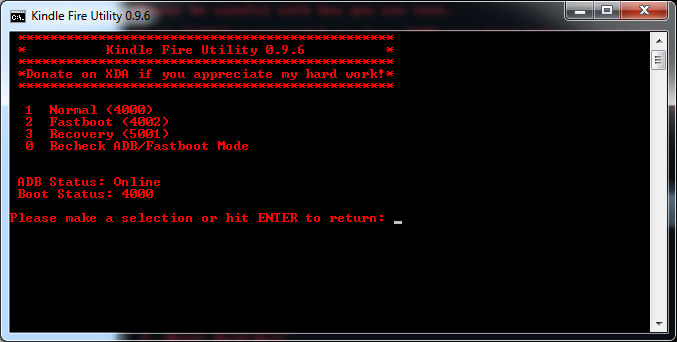
Hit 2 and enter and your device should reboot in a few seconds and stay on the “Kindle Fire” logo.
You can keep hitting 0 and enter to recheck the ADB/Bootstatus of the device and once it is rebooted you should see this with the Boot Status of 4002. The boot status is remembered on the device and won’t allow you to boot normally until you change this setting back to Normal(4000). No amount of rebooting the device will fix this and is a common problem with people.

Don’t press any number and just hit enter to return to the home screen
From this main menu hit 3 and enter to install TWRP which is a recovery software that will need later More information on what it is/does can be found here TeamWin
After that finishes installing get back to the main menu again and hit 5 and enter to install the FireFireFire bootloader.
If those two things installed successfully you can go back into the Bootmode Menu and change it back to Normal(4000) at this point. Follow the same steps we did above to change it into FastBoot(4002).
You can disconnect your device from the computer and reboot it. The first screen that you should see when it reboots is this one
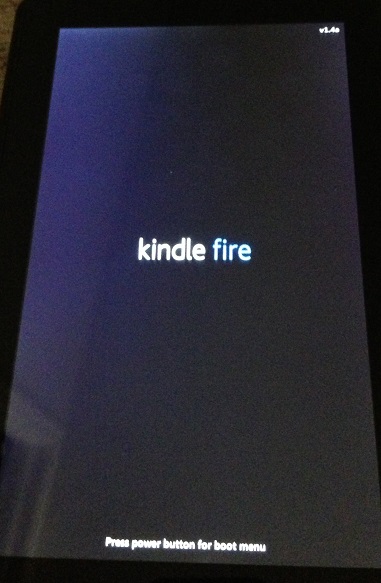
My images are a little fuzzy but the bottom of the screen says “Press power button for boot menu” If you tap the power button (possibly a couple times if it doesn’t recognize it right away) You should see it turn into the menu below.
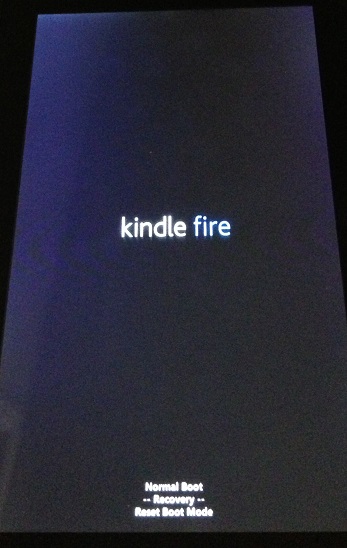
Which says:
Normal Boot
Recovery
Reset Boot Mode
Keep tapping the power button until it selects the Recovery option as in the picture. Once it is selected stop and in a few seconds it will start booting up TWRP which we installed earlier. It will say “Booting…” at the bottom of the screen for a few seconds and then should show this image for a second or so

and then it will slide out of the way showing you the TWRP Menu.
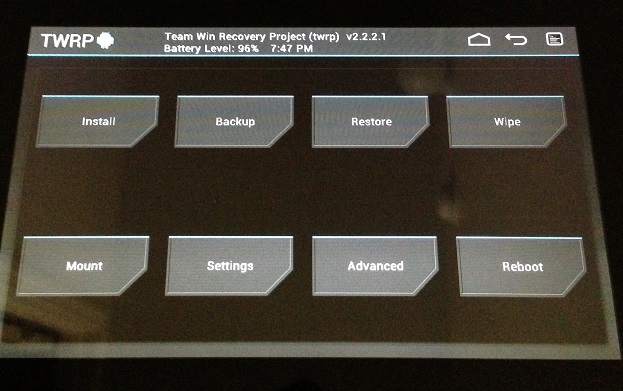
Press on the “Wipe” button and you will see this screen.
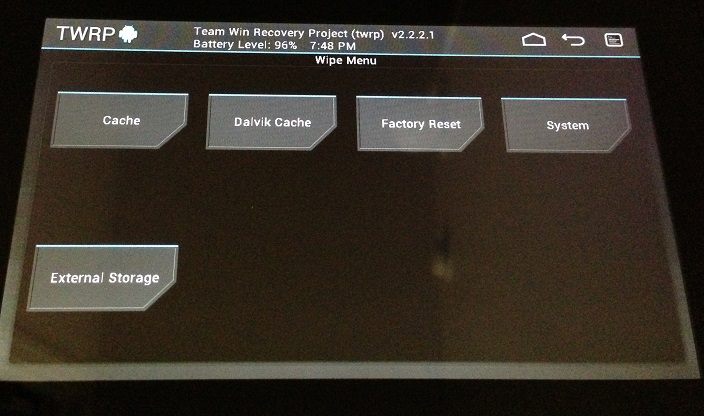
Press on “Factory Reset” button and this screen will show.
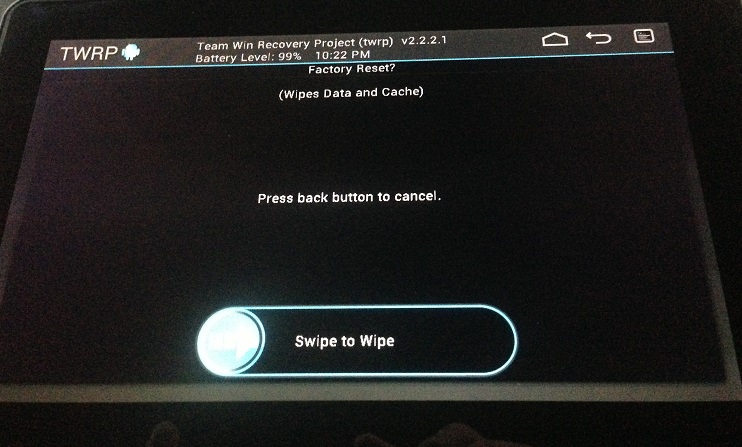
Just swipe to reset the device to Factory Defaults.
Then click on the House shaped icon in the top right to return to the main menu. Click on the “Reboot” button
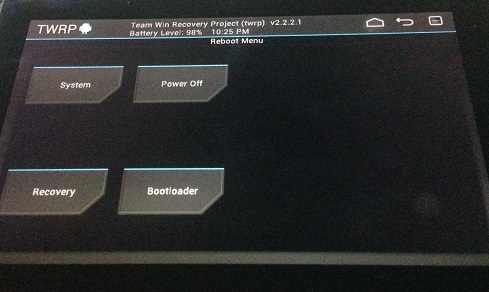
Click on “System” and the device will reboot and you will see this screen again.
Hit the power button a few times and choose “Normal Boot” instead of “Recovery” as we did before and after a bit of time you should be presented with the screens for setting up your kindle.
That’s it and if it ever happens again the software to fix the problem is already on the device and you can reset it if happens again. Depending on exactly what happened to your Kindle Fire you be able to get away with just clearing the cache but the factory reset should pretty much always do the trick even if it is annoying to have to reconfigure the device and pull your apps back down from the cloud.
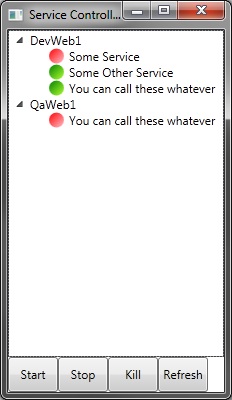
You can grab the code from here: Service Watcher
This is a simple application that allows you to monitor the status of services on any server that you have permissions to.
You can additionally start, stop, and kill processes for services by selecting the one you want and clicking the corresponding button.
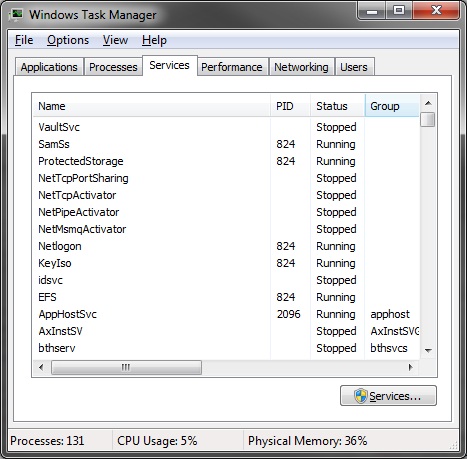
You can quickly find the service short name by looking it up in the task manager on the Services tab.
Figured I would put this up here, mostly for my own reference for some of the links down below. Yeti can be grabbed from its git repository.
As you can see this is a simple one liner. It takes in the filename and will repair it in place. Making a copy of the file before it’s repaired might be a good idea. This method reconstructs the header information on the WMA file so that it is in a valid state again. This fixes issues like players not knowing the length of the file, not being able to skip through the file, and more importantly not being able to convert the file to another format or splicing/combining. You can alternatively pass a stream into the method instead of a file name. The second parameter should almost always be false. It signifies if the filepath/stream being passed in is from a broadcast.
Some notable classes would be the FileProperties
and DataProperties
These are the classes that read and write the header information for the file. The header/section guid’s from the ASF spec are in Yeti for the other areas but the classes that would read and write those values haven’t been created.
If you want to know what those guids are for and what data they point to that information can be found in the ASF specification document found here.
Another tool that is incredibly helpful for figuring out what is wrong with your file is the ‘Windows Media ASF Viewer’. It can tell you any format errors that you have with the file and the structure of the data in your file. The download link can be found here.
I have some running examples of this here: Yeti-Examples. I will mention that the broken.wma file that I used is horrendous audio quality since I recorded it with earbuds held up to my laptop’s microphone. It is just 40 seconds of the mp3 that is also in the examples. The music is from djabacus who is a friend of mine and some of his music can be found here on the audio tab for free.